What tool to use?
In my previous post on Automating Android TV Apps we’ve already discussed fast-growing potential of TV application market and I shared couple of insights on why it’s so important to test those. Just to be clear, all of the concepts given there is also applied to Apple TV apps. That’s why if you missed the article you may want to go back and read it first.
Since TV app development is still an young industry, most of the test tools for it is still immature. Actually I couldn’t find any framework for Apple TV apps testing except the one provided by Apple - XCTest. If you are aware of any other frameworks please give me heads up in the comments.
Speaking about XCUITest, it appeared not that bad. It’s a native built into Xcode instrument. This means two major advantages - full support and maintenance from Apple and iOS/tvOS/watchOS devs from your team probably have been already familiar with it if they wrote at least one unit test. In case you or your team haven’t heard about it yet I recommend to read my post about XCUITest Testing Essentials.
Navigating through Apple TV app
Any interaction in XCTest is the simulation of user action. Whereas Apple TV unlike iPhone or iPad has not gotten any touchscreen, the only input source would be the Apple remote controller.
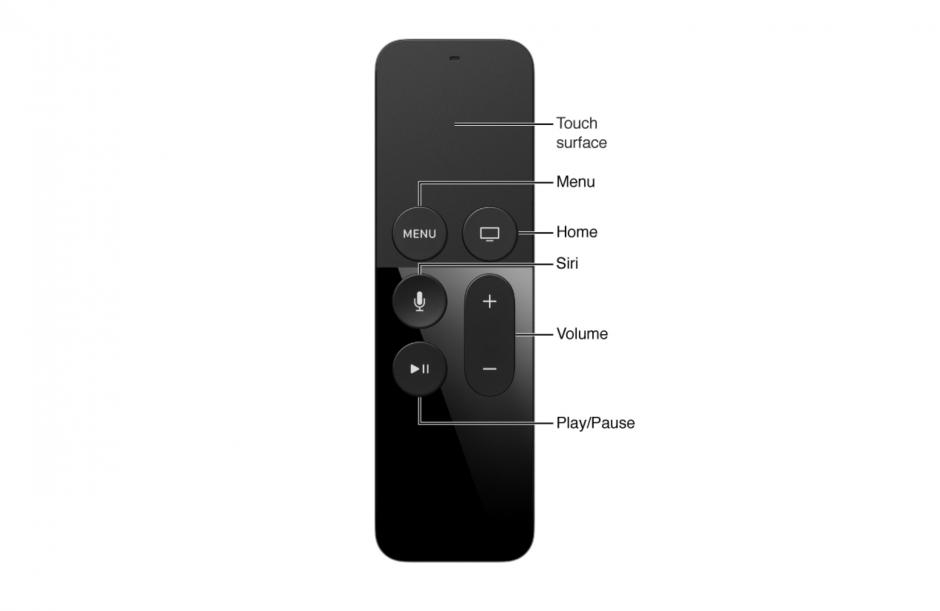
This is the main thing we’d like to consider building automated testing framework for TV app. In tvOS tests Remote controller is represented by XCUIRemote object. Let’s take a look how we can obtain it:
let remote: XCUIRemote = XCUIRemote.shared
Now as we know how to get the Remote let’s find out the main commands for interacting with it:
remote.press(.left)
remote.press(.right)
remote.press(.down)
remote.press(.up)
remote.press(.select)
remote.press(.menu)
remote.press(.playPause)
Also any button can be pressed with some custom duration. This may be useful for long-presses to rewind video clip or music track:
remote.press(.right, forDuration: TimeInterval(5))
You may have already figured out that to select element we’d need to move focus onto it. And similarly to Android TV this part might be a little bit tricky in terms of automation. We’d need to build the algorithm for finding path to element depending on the container (i.e. row, column etc.).
First let’s take a look at the several helper methods to navigate through your app like in the figure above:
focusedreturns the element which is focused at the moment.var focused: XCUIElement { return app.descendants(matching: .any) .element(matching: NSPredicate(format: "hasFocus == true") }hasFocus- one of the properties ofXCUIElementobject. Determines if the particular element is focused.let isFocused: Bool = element.hasFocusexists- another usefulXCUIElement’s property. It indicates if element is visible and present on the screen.let isVisible: Bool = element.exists
The next I’ll go through couple of the most common containers in tvOS apps and will show how to implement path search strategy for each of them.
Strategies for finding elements in Apple TV app
Finding element in the column
We’ll start from the columns, which are usually represented by shelf names and menu titles. It’s the top priority approach we have to implement because any initial step in our tests (e.g. login or choosing the menu) will fail without it.
To find and focus element in any column we’d need to consider couple of things:
- Movement direction is either up or down
- Element may be located in any direction (above or below) from the currently focused one
- Element can be already focused which means all we have to do is to press select button
- We need to know when the movement direction should be changed
- At some point we’ll have to figure out when to break cycle if element was not found
Keeping all those thoughts in mind we can build trivial approach for finding element in the columns:
func findInColumn(_ element: XCUIElement) {
 var isEndReached = false
 while !element.exists || !element.hasFocus {
  let previous: String = focused.details
  moveFocus(isEndReached)
  let current: String = focused.details
  if previous == current {
   if isEndReached {
    XCTFail("Element \(element) was not" +
          " found in column or could not be focused")                }
   }
   isEndReached = true
  }
  print("Element \(element) was found and focused")
  XCUIRemote.shared.press(.select)
}

func moveFocus(_ isEndReached: Bool) {
 XCUIRemote.shared.press(isEndReached ? .up : .down)
}
The explanation is not hard either. At first we’re moving down through the column elements one by one, checking if the target element is visible and focused. While doing that we also check if end of the column is reached by comparing previously focused element to current one. In case the end is reached we have to change our direction and inspect the upper side of the column. After checking the column for the second time by moving up we will fail the test if the end is reached again since it signals that element was not found.
Comparing XCUIElements
Now let’s stop for the moment and take a glance on how elements are compared in the code snippet above. You may have noticed I’m using custom method details for doing that. The reason for this is the fact that XCUITest does not contain any appropriate mechanism to verify equality of the XCUIElement objects. Thus I implemented my own extension for that:
extension XCUIElement {
 var details: String {
 let regex = try! NSRegularExpression(pattern: "0x\\S+",
    options: .caseInsensitive)
 return regex.stringByReplacingMatches(in: debugDescription,
    options: [], range: NSMakeRange(0, debugDescription.count),
     withTemplate: "")
 }
}
If you read my previous post about XCUITest Basics, you already know that each XCUIElement has debugDescription variable which represents its detailed debugging information. So basically if two elements had same debug description, they would be the same element in terms of the application.

But there is one limitation here. Debug description is generated in runtime and most of the contained data elements get ids based on the current system time. They are represented by hexadecimal numbers in the debug information string (e.g. 0x60000018c300). That’s why for successfully comparing of two elements I had to get rid of them using Regex 0x\\S+.
Finding element in the row
Usually most of the media data in Apple TV is stored in so called “shelves”. Since these shelves are no different than usual rows, we’ll need to implement some approach for finding elements in those.
We’ll use the same code as we leveraged for column look-up with one single change moveFocus function.
func moveFocus(_ isEndReached: Bool) {
 XCUIRemote.shared.press(isEndReached ? .right : .left)
}
.down was replaced by .right one, and .up by .left. This way we are able to inspect left and right side of the given row.
Finding element in the infinite carousel
Infinite carousels are the common containers in tvOS apps. Basically they are the same as rows but without end.
For carousel search we could use the same algorithm we used before, but with minor changes:
func findInCarousel(_ element: XCUIElement) {
 let first: String = focused.details
 while !element.exists || !element.hasFocus {
  XCUIRemote.shared.press(.right)
  let current: String = focused.details
  if current == first {
   XCTFail("Element \(element) was not" +
        " found in the carousel or could not be focused")
  }
 }
 print("Element \(element) was found and focused")
 XCUIRemote.shared.press(.select)
}
At the beginning we memorize focused element and then while moving and searching for target we compare every next focused one to the first one. Once focused one is equal to first memorized element we’ve made full circle and the test should be failed.
Finding element in the grid
Grid is the common place for storing collections of elements in order to search and navigate through them.
In my opinion, grid is the most difficult container in terms of automation. There are bunch of things you need to think of while looking up for some element in it
- If we want to find element in one iteration we need to start search from the very first element in the grid which is top left one
- Grid’s row may not be completely visible. Thus if that’s the case for you, you’ll need to completely inspect whole row before moving further
- Speaking of optimization, to inspect everything in one iteration we’ll have to move in different directions for each row (i.e. at first to the right, then - to the left, after that - to the right again and so on)
- Grids might be asymmetrical (last row is incomplete), and that would require to inspect both very bottom elements (right and left) to make sure there is no transition to the next row possible
This scheme may help you to understand algorithm’s logic:
1  -> 2  -> 3  -> 4  -> 5
                        |
                        v
6  <- 7  <- 8  <- 9  <- 10
|
v
11 -> 12 -> 13 -> 14 -> 15
   <-    <-    <-    <-
|
v
16 -> 17 -> 18
The grid in this scheme is asymmetrical for demonstration purposes. Just after the the bottom right (i.e. 15th one) element is approached (isEndReached = true), algorithm will change direction and go to the most left bottom element (i.e 11th one) to search for possible incomplete row.
Here is complete implementation of the Grid look-up :
func findInGrid(_ element: XCUIElement) {
 var isMovingRight = true
 var current: String
 var previous: String? = nil
 var isEndReached = false

 while !element.exists || !element.hasFocus {
  moveFocus(isMovingRight)
  current = focused.details

  if current == previous {
   XCUIRemote.shared.press(.down)
   isMovingRight = !isMovingRight
   current = focused.details
   if current == previous {
    if isEndReached {
     XCTFail("Element \(element) was not" +
               " found in the grid")
    } else {
     isEndReached = true
    }
   }
  }
  previous = current
 }
 print("Element \(element) was found!")
 XCUIRemote.shared.press(.select)
}

func moveFocus(_ isMovingRight: Bool) {
 XCUIRemote.shared.press(isMovingRight ? .right : .left)
}
The basic idea is the same as ones from previous strategies. The key difference is that we move focus one level lower after end of the row and only then we change direction. Also to make sure we inspect the last row in case of asymmetrical grid we check left and right sides of the last/pre-last row.
Further optimizations
No doubt, all the of the given algorithms could be optimized in one way or another. For example, you may increase the amount of steps if element is not visible to speed up selection movement. Also you could skip the whole row in Grid Search if all of its elements are visible and there is no target element spotted yet.
The next step in terms of optimization I would do, is extracting duplicated code into some method. Usually I create enum Direction and store such values as .row, .column or .grid there. This helps to determine which direction should be chosen if I reuse the same method findElement for all strategies.
The further move to increase the code health of your automated framework is the proper object oriented design. It can be achieved by implementing well-known test automation patters, like Page Object Pattern.
You may already know, that it’s essential to parallel tests to perform more of them in a tighter window, get feedback earlier and release faster. So another thing on the road to successful automation would be simultaneous run of XCUITests on multiple tvOS devices. I will explain how to do that in one of my next posts.
If you have your own thoughts or experiences regarding optimization of Apple TV tests, please share them in the comments.

Comments