Why XCTest?
As you may have heard during “Hey Siri” event in 2015 Apple introduced its own interpretation of testing framework, called XCTest (or XCUITest if we’re talking about UI testing). I was surprised to find out that even though it has been already 2 years from its release major part of the Test developers are still being skeptical about this framework.
From my perspective this instrument has gotten everything you need for writing automated tests against iOS/tvOS platforms and I wouldn’t go with anything else unless I need cross-platform (iOS and Android) support. And even then I would consider separation of the frameworks. But that’s another topic for discussion.
Here is why I would suggest XCTest over other tools for UI testing of iOS and tvOS applications:
- No additional components required to be installed. Starting from Xcode version 7 Apple ships XCTest prebuilt into its development kit and all you need to do is just activate it. I will show how to do that in further reading.
- Swift/Objective-C native language support. If you think of it, it’s pretty big advantage. Since there is no learning curve or language barrier iOS developers and Automation engineers could support/review/extend each other’s test scripts and collaborate on creating new ones.
- Easy CI integration. Xcode allows to execute tests via command line and this is well used by all major CI systems, like Jenkins, TeamCity, Travis or Bamboo. All of them could be easily set up to run iOS functional tests and collect their results.
- Speed. There is no secret that all of the iOS UI test frameworks available on the market are based on XCUITest infrastructure (well, sometimes it may be its ancestor - UI Automation). Obviously something on top would work slower than its lower layer by itself. Finding elements, extracting their attributes, typing text etc - everything is a bit faster in pure XCTest.
- Test Recorder. I don’t use this one but it might be beneficial for beginners to leverage Recorder. One can write actual test steps agains his app and after that see their implementation as an UI test. Yes, it won’t be perfect but with minor changes we could use it in our framework. That said it’s great for learning purposes.
- tvOS support. For the moment there are no reliable frameworks out there which can easily support testing on Apple TV devices. Thus if you want to verify tvOS app, XCUITest is the only way to go. One of my next posts will be completely dedicated to Apple TV testing.
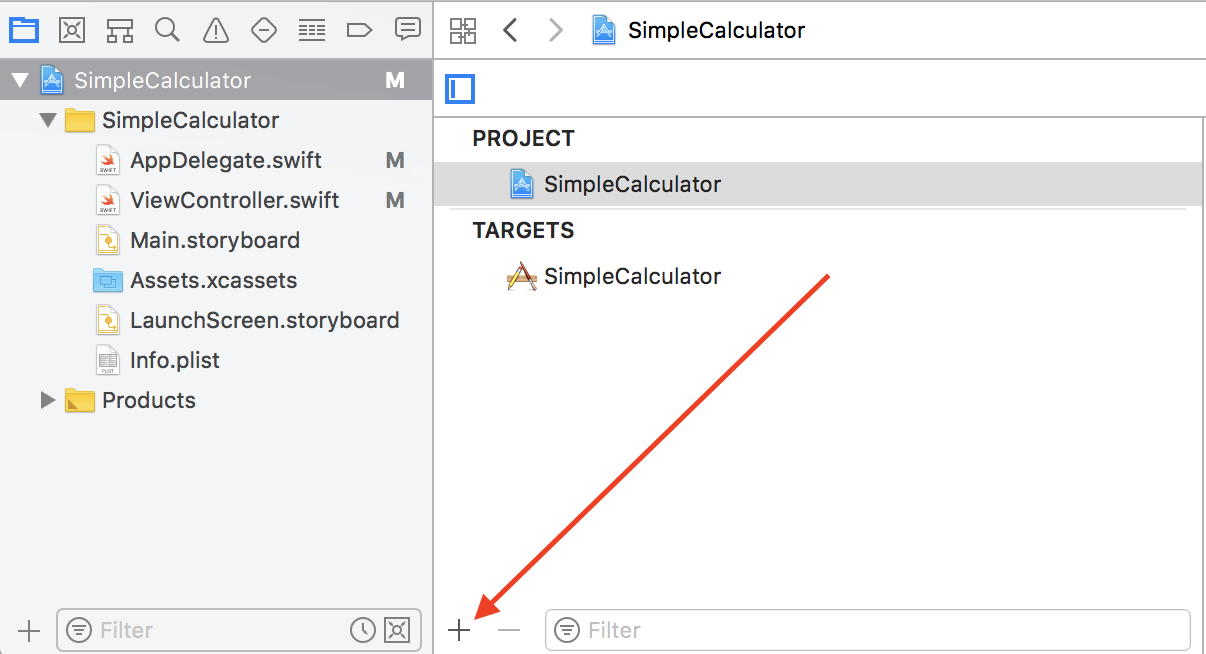
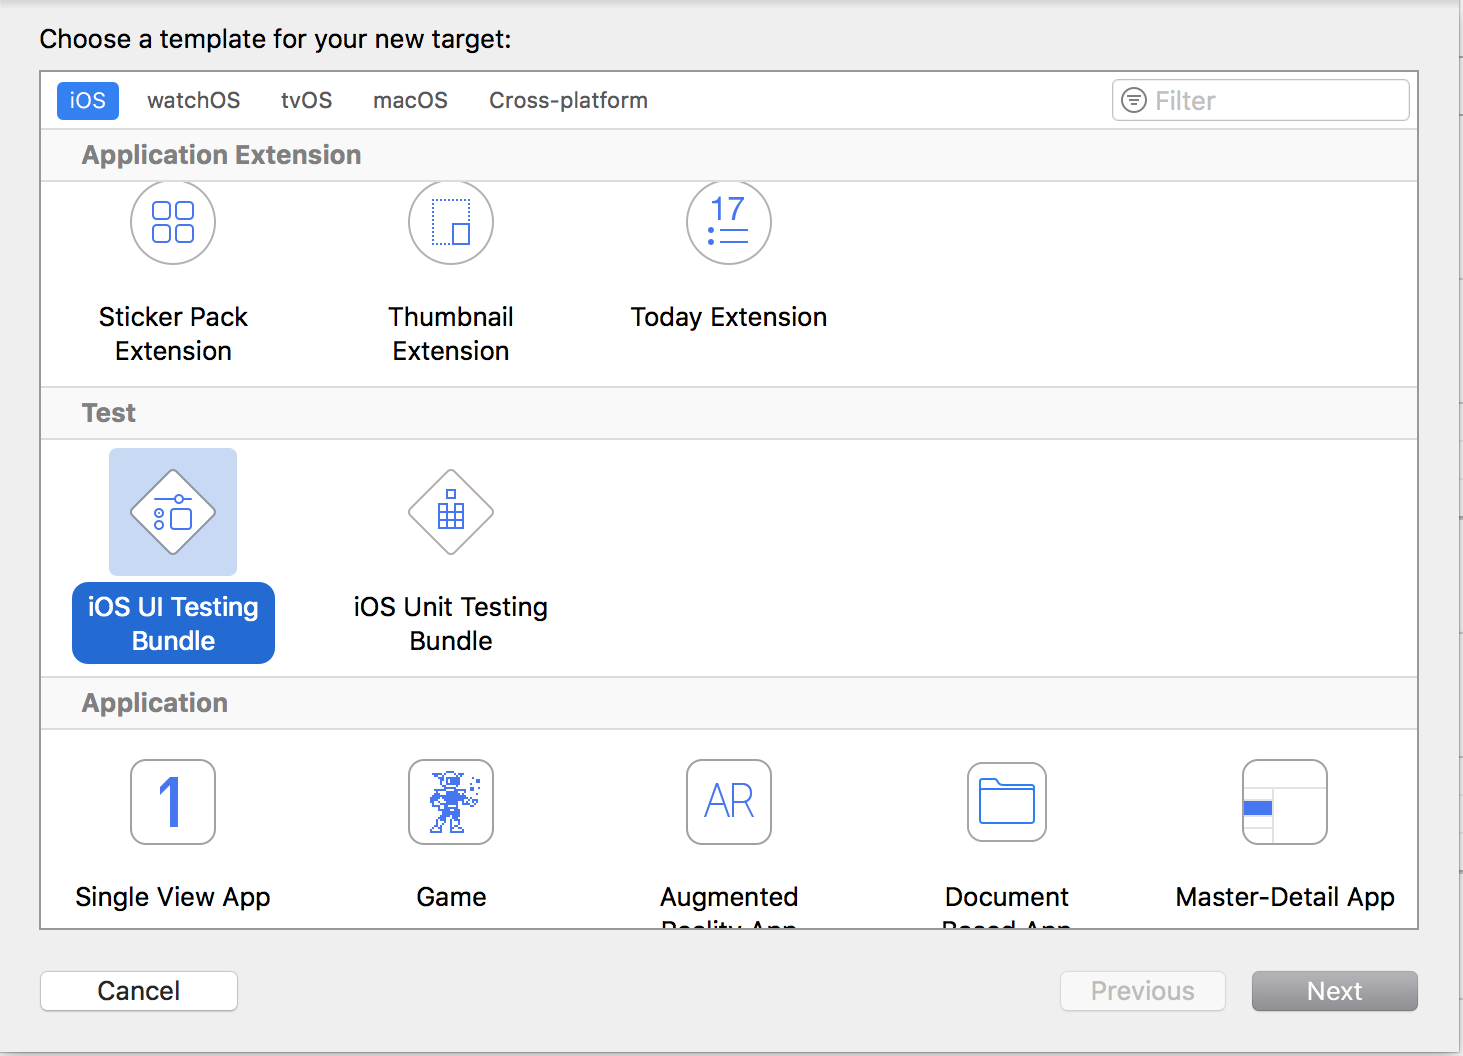
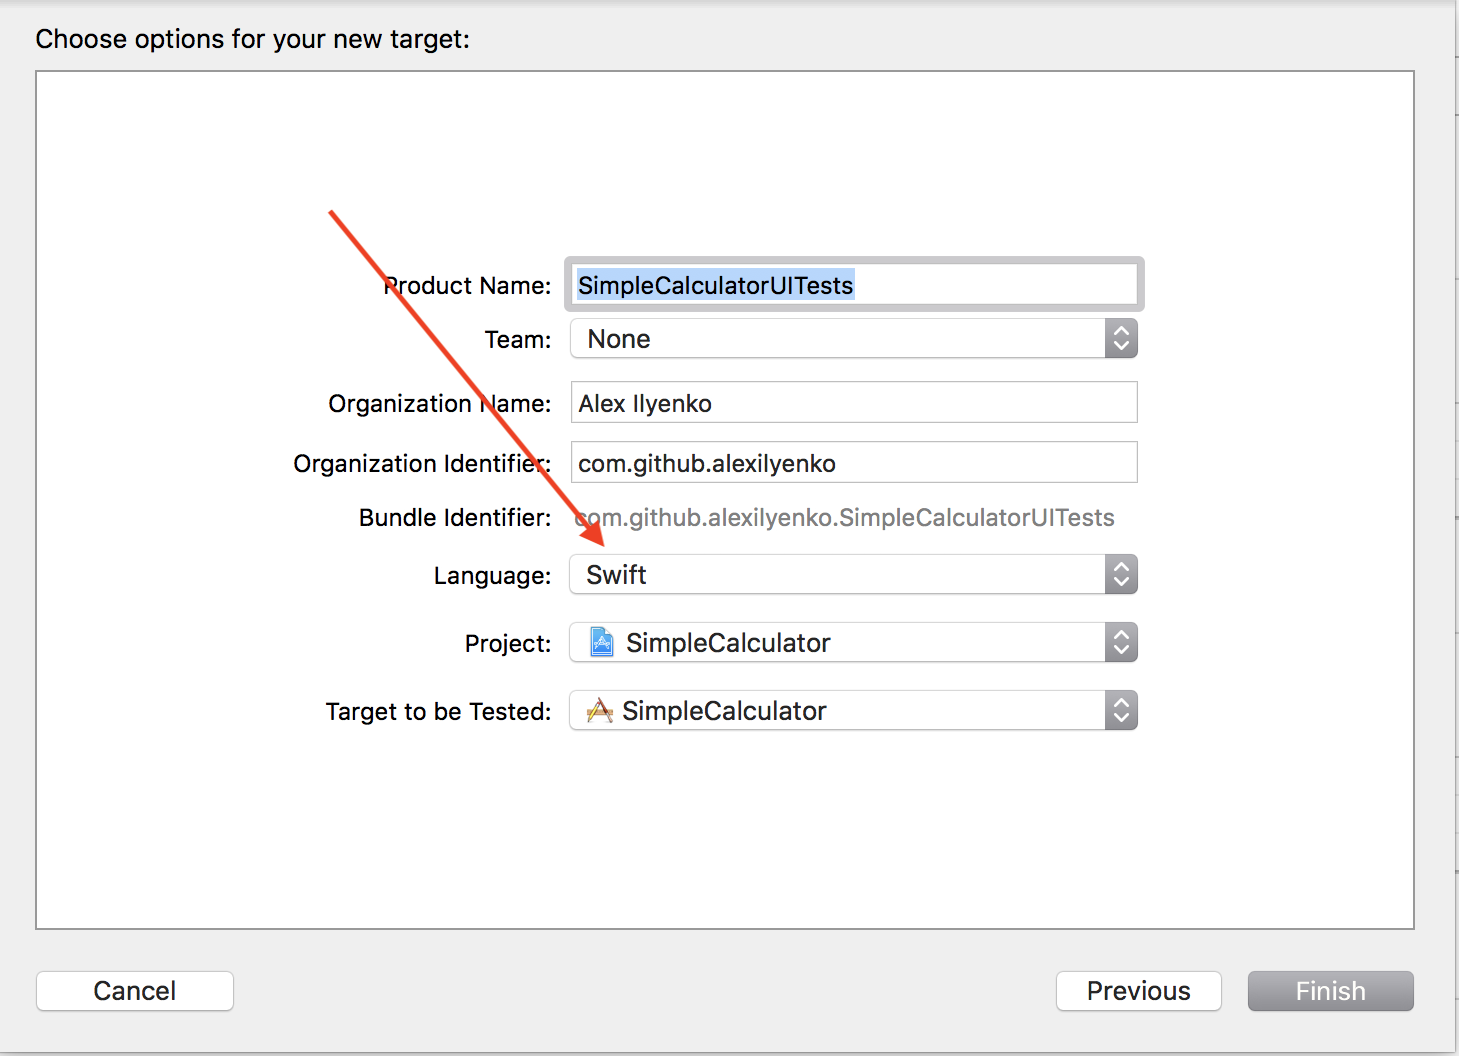
How to get started writing tests with XCTest
It’s pretty simple. All we have to do is to add extra target to our Xcode project.
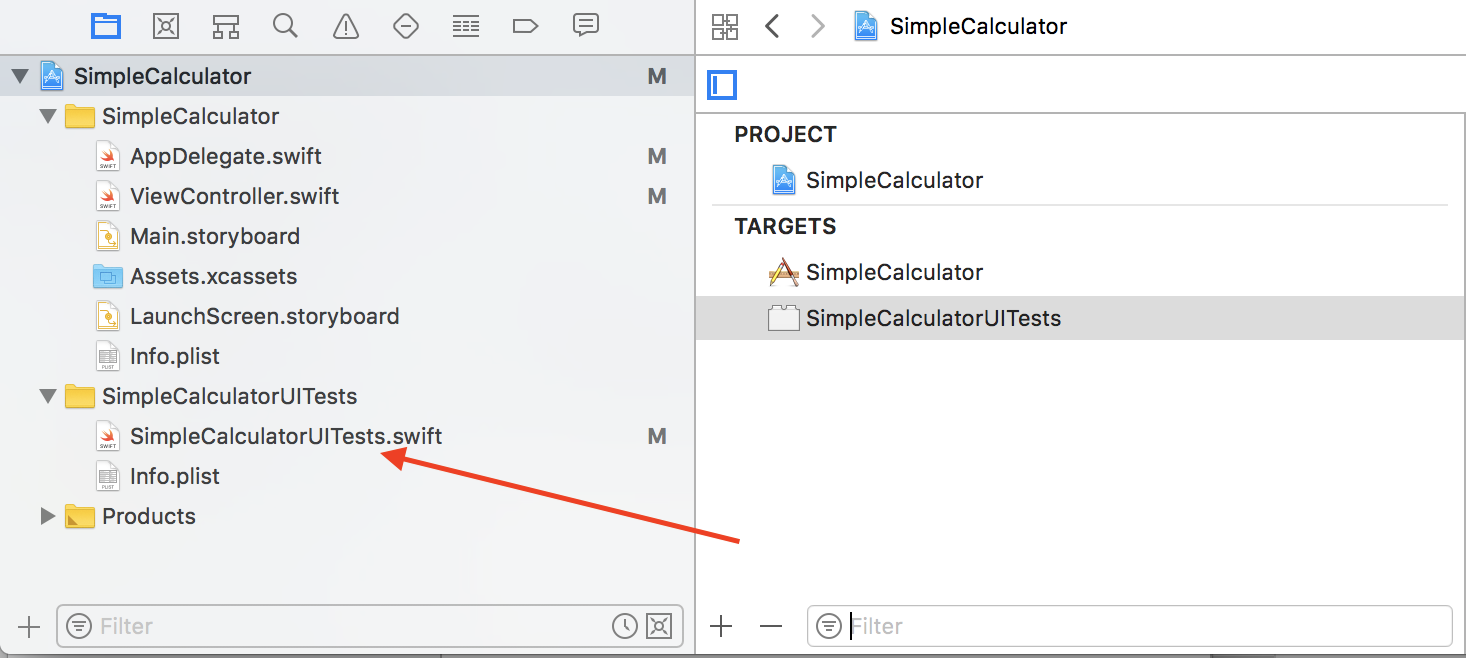
After you went through all the steps above you should see new target was added to your project along with some autogenerated sources. They are not very useful but may give us an idea how to start our app before the test and close it afterwards.
Introduction to XCUITest API
XCTest is rather light-weight library, all of its classes are conveniently located in one file - XCTest. Here are the main ones of them:
- XCUIElementQuery - class for querying app’s UI hierarchy to find UI element. For simplicity we could treat element query as an array of all elements, which match to the given criteria.
XCUIElementQuerycan be chained with other queries.let queryForButton: XCUIElementQuery = app.buttons.descendants(matching: .any) - XCUIElement - one of the main classes in XCTest library. It represents UI element in iOS app user interface hierarchy. Lots of stuff can be done to it (we can click on it, read and verify its attribute values, swipe it, drag-and-drop it, input text into it etc).
let firstButton: XCUIElement = app.buttons.firstMatch firstButton.click() let imageWithId: XCUIElement = app.images["identifier"] image.swipeUp() - XCUIElement.Type - enum for types of the UI elements which can be located. For instance
.image,.button,.alert,.anyetc. Types are often used withXCUIElementQueryto build query for finding UI element.let cellType: XCUIElement.`Type` = .cell let queryForImageType = app.descendants(matching: .image) - XCUIApplication - one of most important classes for building successful UI test framework. It represents iOS application and basically is the only way to interact with it. It will allow us to start and terminate the app, locate elements inside it and verify their attributes. Since
XCUIApplicationextendsXCUIElementclass, you may consider it as a root element in app hierarchy.let app = XCUIApplication() app.launch() - XCUIScreen - represents physical screen(s) of the iOS/tvOS/macOS device. Its main purpose is snapping screenshots in test runtime.
- XCUIScreenshot - a captured image of a device screen or its part.
// Take a screenshot of an app's first button. let windowScreenshot = app.button.firstMatch.screenshot() app.terminate() // Take a screenshot of the screen after app was terminated let mainScreenScreenshot = XCUIScreen.main.screenshot() - XCUIDevice - as you can guess this class represents device which tests are being run on. It’s not frequently used in testing, but you can do some interesting stuff with it. For example, it can help you emulate hardware buttons, check screen orientation and interact with Siri, which was added in the latest release.
let device = XCUIDevice.shared device .siriService .activate(voiceRecognitionText: "Hey Siri! How are you?") - XCUIRemote - this class simulates interactions done via physical remote controller (e.g. on Apple TV devices).
let remote = XCUIRemote.shared
remote.press(.playPause)
The classes above are the most used by majority of developers in their test frameworks. But of course these are not all of them. Full XCTest API for user interface tests can be found in official documentation.
XCTest UI test example
Assuming we’ve got familiar with main classes in XCUITest library, let’s go ahead and create our first ever test script.
class SimpleTest: XCTestCase {
 // Creating app instance
 let app = XCUIApplication()

 override func setUp() {
  // Setting continue after failure strategy
  continueAfterFailure = false
  // Launching the app
  app.launch()
 }

 func testForm() {
  // Finding text field
  let editText = app.textFields["edit_text"]
  // Sending text to field
  editText.typeText("123456")

  let submitButton = app.buttons["submit"]
  // Tapping on button
  submitButton.tap()

  let alert = app.alerts.firstMatch
  // Waiting for alert to appear
  _ = alert.waitForExistence(timeout: TimeInterval(10))
  XCTAssertEqual(alert.label, "Success!")
 }

 override func tearDown() {
  // Taking screenshot after test
  let screenshot = XCUIScreen.main.screenshot()
  let fullScreenshotAttachment = XCTAttachment(screenshot: screenshot)
  fullScreenshotAttachment.lifetime = .keepAlways
  add(fullScreenshotAttachment)
  // Closing the app
  app.terminate()
 }
}
This test is looking for the text field at first, then inputs some text into it, presses the button and waits for alert to appear. When alert appears, it will verify its text.
There was a basic wait used in the code snippet above. If you want to find more about advanced techniques of doing that, check out my recent post about Waits in XCUITest.
That’s it for today’s XCTest UI Testing Basics. If you have something to add please share it in the comments.

Comments