Why Page Object Pattern
We already discussed the Page (Screen) Object Pattern and why you should consider using it in development of your test automation architecture in Page Object for Android UI Tests post. In today’s article we won’t go into deep, instead I’ll shed the light on the key points of using the pattern and share couple of practical examples. But if you’re interested in the details don’t hesitate to check out my original post about it.
The snippets below are written in Swift, but the concept can be applied to any programming language, including Objective-C. All of the examples can be found in GiHub Repo, which contains iOS Calculator application and user interface test suite for the app verification.
At first let’s take a look at the hypothetical example of UI test for calculator app:
func testPlus() {
 app.buttons["8"].tap()
 app.buttons["+"].tap()
 app.buttons["2"].tap()
 app.buttons["="].tap()
 let result = Double(app.staticTexts.firstMatch.label)
 XCTAssertEqual(10.0, result,
    "Result should be equal to 10")
}
This test’s gotten lots of problems:
- Assuming we have bunch of tests like that and our UI is going to be frequently changed we’ll be constantly fixing our tests to support it
- Test is hard to understand. OK, this one is easy, but real life test case might have complicated logic for transitions between views and operating with objects. And dealing with inner UI elements instead of paying attention to domain specific things makes it harder to understand, especially for app developers or non-tech savvy people from management.
- Outrageous code duplication. Did you pay attention how we found the elements for interaction? We’ll have to find the same elements and repeat same steps every time which contradicts to one of the main programming principles - reduce code duplication.
- App interactions and data are coupled. This one is a big problem since it won’t allow us to implement DDT and we’ll have to run our tests on the predefined set of data, which may be the reason for flaky tests to appear.
All of those problems could be solved by leveraging of Page / Screen Object Pattern in our iOS user interface tests. I like to illustrate this pattern with simple diagram containing screen objects of Facebook app:
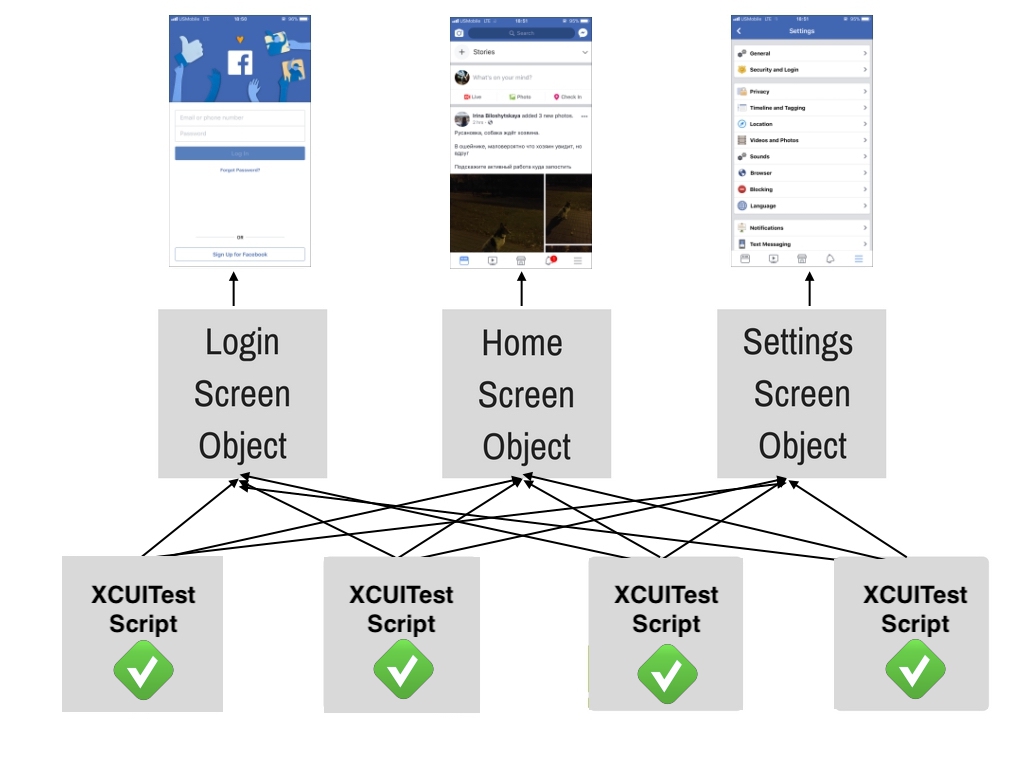
Figure above shows that in our hypothetical test fixture we’d have three Page Objects representing Login, Home and Settings views of the app which are accessible for any test script in our framework.
Test Setup
I like to refer to code reusing as the most valuable technique in development since it helps to design straight-forward and easy-to-maintain solutions.
As you already know we will use it for constructing our Screen Objects but obviously those objects can not be utilized without tests, and tests require clean code too. So let’s go ahead and move every thing that is applicable to every tests to one ancestor class - BaseTest. Good candidates for that would be setUp and tearDown methods.
class BaseTest: XCTestCase {
 private let app = XCUIApplication()

 override func setUp() {
  continueAfterFailure = false
  app.launch()
 }

 override func tearDown() {
  let screenshot = XCUIScreen.main.screenshot()
  let fullScreenshotAttachment = XCTAttachment(screenshot: screenshot)
  fullScreenshotAttachment.lifetime = .deleteOnSuccess
  add(fullScreenshotAttachment)
  app.terminate()
 }
}
Note: everything from the snippet above and even more XCTest stuff is explained in one of my previous posts on XCUITest Essentials. Thus if you’re not comfortable with test tool from Apple yet, you might want to take a look at it.
Next we will extend all of our test classes from BaseTest.
Creating Page Object
The same as we used calculator app for UiAutomator examples, we will use iOS Calculator app for XCTest Screen Object creation training in this post.
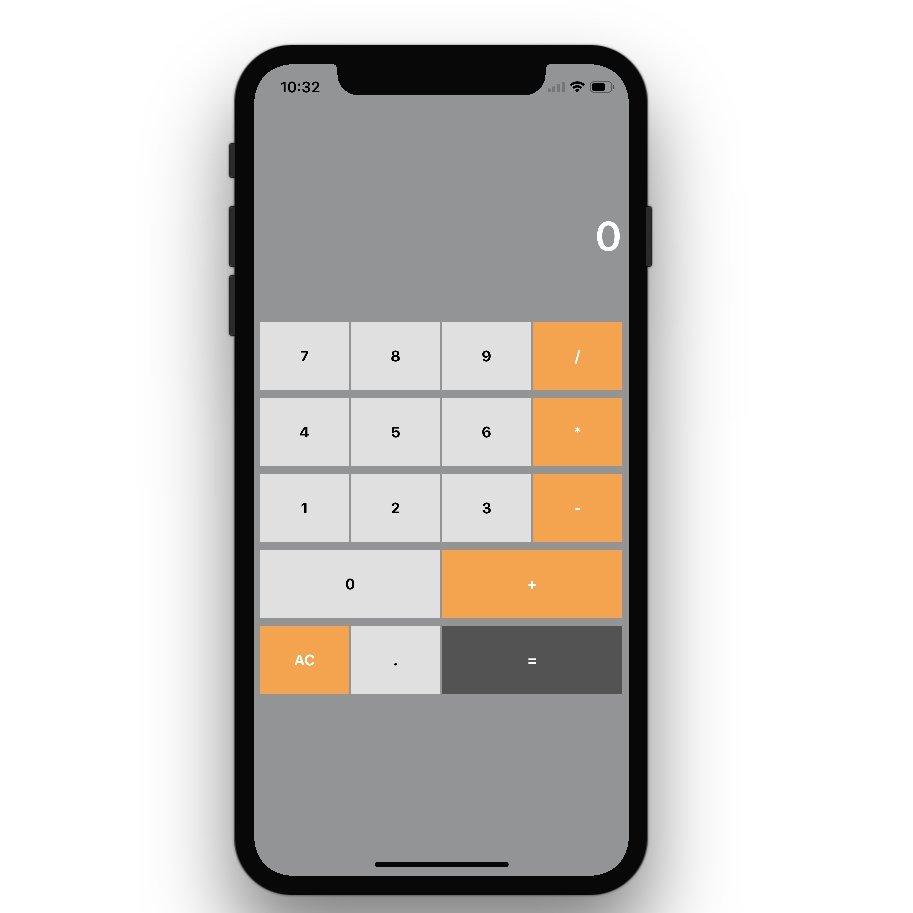
And again since our app is pretty simple, as well as Android implementation, iOS one will consist only from one Page Object. Let’s call it Calculator.
class Calculator: BaseScreen {
 private lazy var plusButton = buttons["+"]
 private lazy var multiplyButton = buttons["*"]
 private lazy var equalButton = buttons["="]
 private lazy var resetButton = buttons["AC"]
 private lazy var minusButton = buttons["-"]
 private lazy var screen = findAll(.staticText).firstMatch
 private lazy var buttons = findAll(.button)

 var numberOnScreen: Double? {
  return Double(screen.label)
 }

 func enter(_ number: Double) -> Calculator {
  inputNumber(number)
  return self
 }

 func plus(_ number: Double) -> Calculator {
  return calculate(number, plusButton)
 }

 func multiply(byNumber: Double) -> Calculator {
  return calculate(byNumber, multiplyButton)
 }

 private func inputNumber(_ number: Double) {
  for ch in String(number).characters {
   buttons[String(ch)].tap()
  }
 }

 func reset() -> Calculator {
  resetButton.tap()
  return self
 }

 func minus(_ number: Double) -> Calculator {
  return calculate(number, minusButton)
 }

 private func calculate(_ number: Double,
            _ operationButton: XCUIElement) -> Calculator {
  operationButton.tap()
  inputNumber(number)
  equalButton.tap()
  return self
 }
}
Complete implementation can be found here.
The gist above illustrates how usual Page Object class looks like. Pay attention to the variables and methods. All of the UI elements which can be found on the screen (page) are put under variables like plusButton or screen. This means that in case our Calculator view’s elements locators change, we’ll have to do minimal work by changing variables here. Besides that all of the methods represent some actions which may be done on the page, like enter or plus. They will also help us to encapsulate all page specific things (by reducing the code duplication) and help tests to be more readable.
Additionally I’d like to note that Calculator class conform to some BaseScreen protocol. In usual situation it would be some abstract entity representing each and every screen of our app and containing their common variables and methods. It’s another good way to reduce repeatable code. Since we’re not building complex framework here, our protocol contains only one method findAll for finding elements of the given type on the page. Note, how we simulated abstract class by usual Swift protocol and its extension.
protocol BaseScreen {
}

extension BaseScreen {
 func findAll(_ type: XCUIElement.ElementType) -> XCUIElementQuery {
  return app.descendants(matching: type)
 }
}
Mainly it’s a good place for incapsulating all device specific actions (i.e. methods like findAll, isVisible, getText or dragAndDrop) and storing common locators.
How to find locators
The next thing I’d like to talk about is locators or selectors. They are used by XCTest to find UI elements on the screen. I already told my readers how to build and use those in XCTest Basics article, but how does one find them in his app?
There is a simple trick for that! The thing is that each XCUIElement has debugDescription variable, which shows the whole subtree under the element if it gets printed. Besides that XCUIApplication extends that class, which means we can print the whole tree of user interface elements to console by invoking that method on the app instance. This can be done by running simple test in your sandbox:
func testPrintTree() {
 print(app.debugDescription)
}
The executed command will give us output like that:
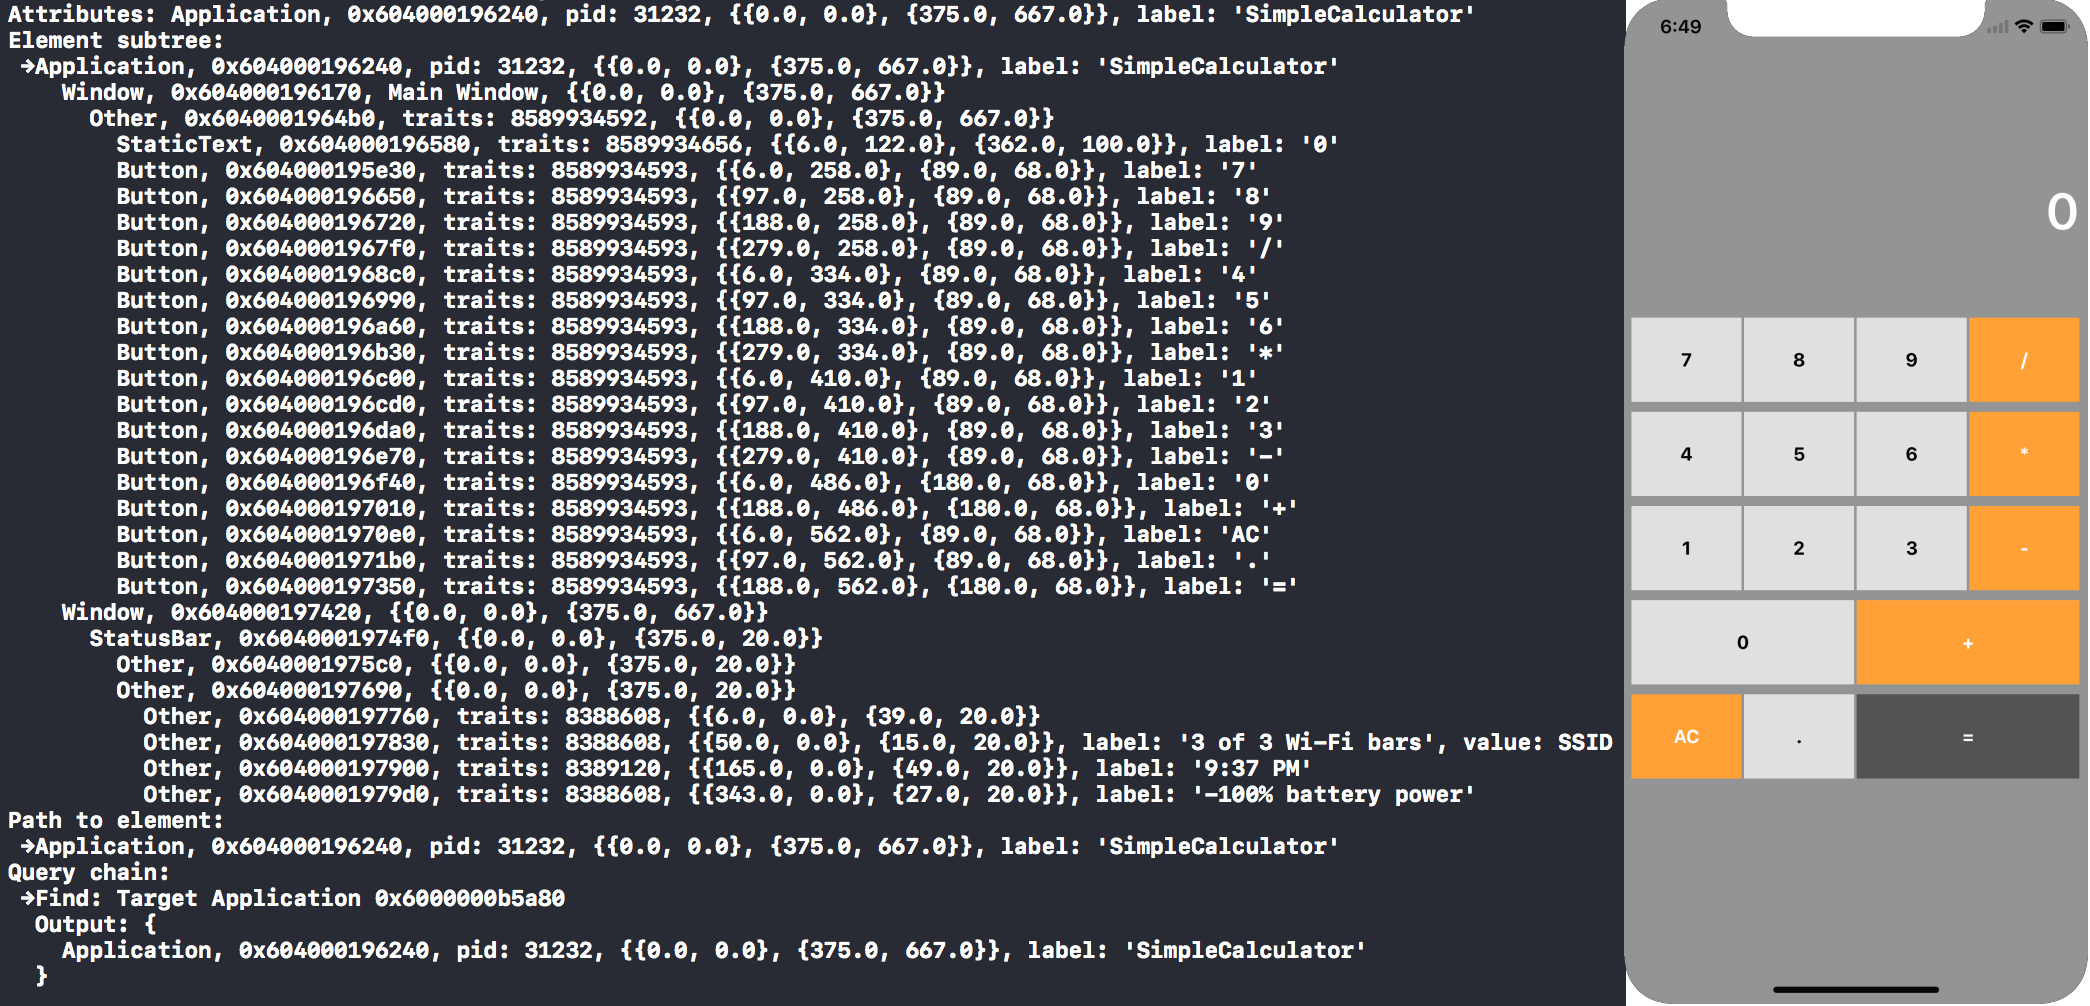
If we compare it to actual app one by one, it will become clear how to generate locators. For example we can observe full tree and the depth of all elements on the screen. We are also able to find out their types, accessibility IDs, labels, ancestors and children here.
Implementing Tests
The last but not least thing to do is to implement final test using designed Page Objects:
func testPlus() {
 let firstNumber = randomNumber
 let secondNumber = randomNumber
 let calculator = Calculator()
                .enter(firstNumber)
                .plus(secondNumber)

 XCTAssertEqual(firstNumber + secondNumber,
                  calculator.numberOnScreen)
}
Notice, that the test became much more readable compared to previous implementation. Now it finally speaks in domain specific language instead of exposing inner app details like locators and XCTest interactions. Also it got rid of data coupling. Now we can pass any test data (see randomNumber variables) and design our tests completely independently from it.
Best Practices
The last thing I wanted to share today is best practices of building you framework with Page Object Pattern.
-
Same elements/widgets. In case you have couple of screens containing the same logic you may consider extend both of them from one common parent and encapsulate that logic into it. Usually
BaseScreenis a great fit for that if the “thing” is applicable for all screens extending it. - Chain Methods. You might have already noticed this technique in the test example but I’d like to draw additional attention to it. Each of the public methods of your Screen Object should return something - either self, other screen object or data, so we could build our tests in the way usual (i.e. manual) test cases are written. For instance:
 let result = calculator
             .enter(number1)
             .plus(number2)
             .minus(number3)
             .numberOnScreen
As I said before our simple framework contains only one Screen Object, but in real world it’s not the case. Here is how returning other Screen Objects may come in handy:
let loginScreen: LoginScreen = openApp() let home: HomeScreen = loginScreen.loginAs(defaultUser) - Waits. Our test is pretty simple and its flow is straight-forward. But in general apps have complicated logic with lots of animations. There are many cases when output of the executed actions can not be seen right away. It may be especially true in the moments when transition between screens happens. Thereby it’s generally a good practice to wait for the condition of fully loaded screen to be satisfied in the constructor of that screen object. The condition is usually represented by visibility of the element:
init() {
  waitUntilVisible(element: someElement,
          timeout: someTimeout)
}
In my opinion, it’s impossible to build fast and reliable automation without explicit waits. I wrote the article about Waits in XCUITest and you may want to check it out if you want to master this practice.
- Parallel run. The last advanced technique for today will be test parallelization. It’s not directly related to Page Object pattern but it affects your testing approach in general. It’s essential to execute your tests simultaneously to perform more of them in a tighter window, get feedback earlier and release faster. I wrote about Parallel Tests with XCUITest in one of my posts.

Comments