Why UiAutomator?
Time to time my colleagues from other departments ask me about framework I’m using for automating UI tests on Android and Android TV devices. And they really wonder when I tell them I’m using UiAutomator for those purposes. Not because they think it’s not appropriate solution for their tasks, but rather because they haven’t even heard about this kind of framework.
From my side it’s odd to hear that. No, don’t get me wrong, I’m familiar with all those fancy frameworks like Appium, Espresso, Robotium etc (and we’ll talk about them in my further posts). But let’s face the truth - most of the functionality these instruments provide you’ll never use, and to support them you’ll have to have whole team of automation engineers. And that’s expensive, right?
On the other hand there is UiAutomator.
UiAutomator is a light-weight, easy-to-learn library, developed by Google to make things done fast, when you don’t want to spend lot’s of time on developing test code and its maintenance.
Still not convinced? What if I tell you this little tool can help you to build fully functional, extendable and reliable test frameworks? Tempting, isn’t it? Stay tuned!
Disclaimer: we’re going to talk about UiAutomator2 since it’s the most recent version, which includes all the fixes of the problems UiAutomator(1) had.
How to get started with UiAutomator?
Android Studio
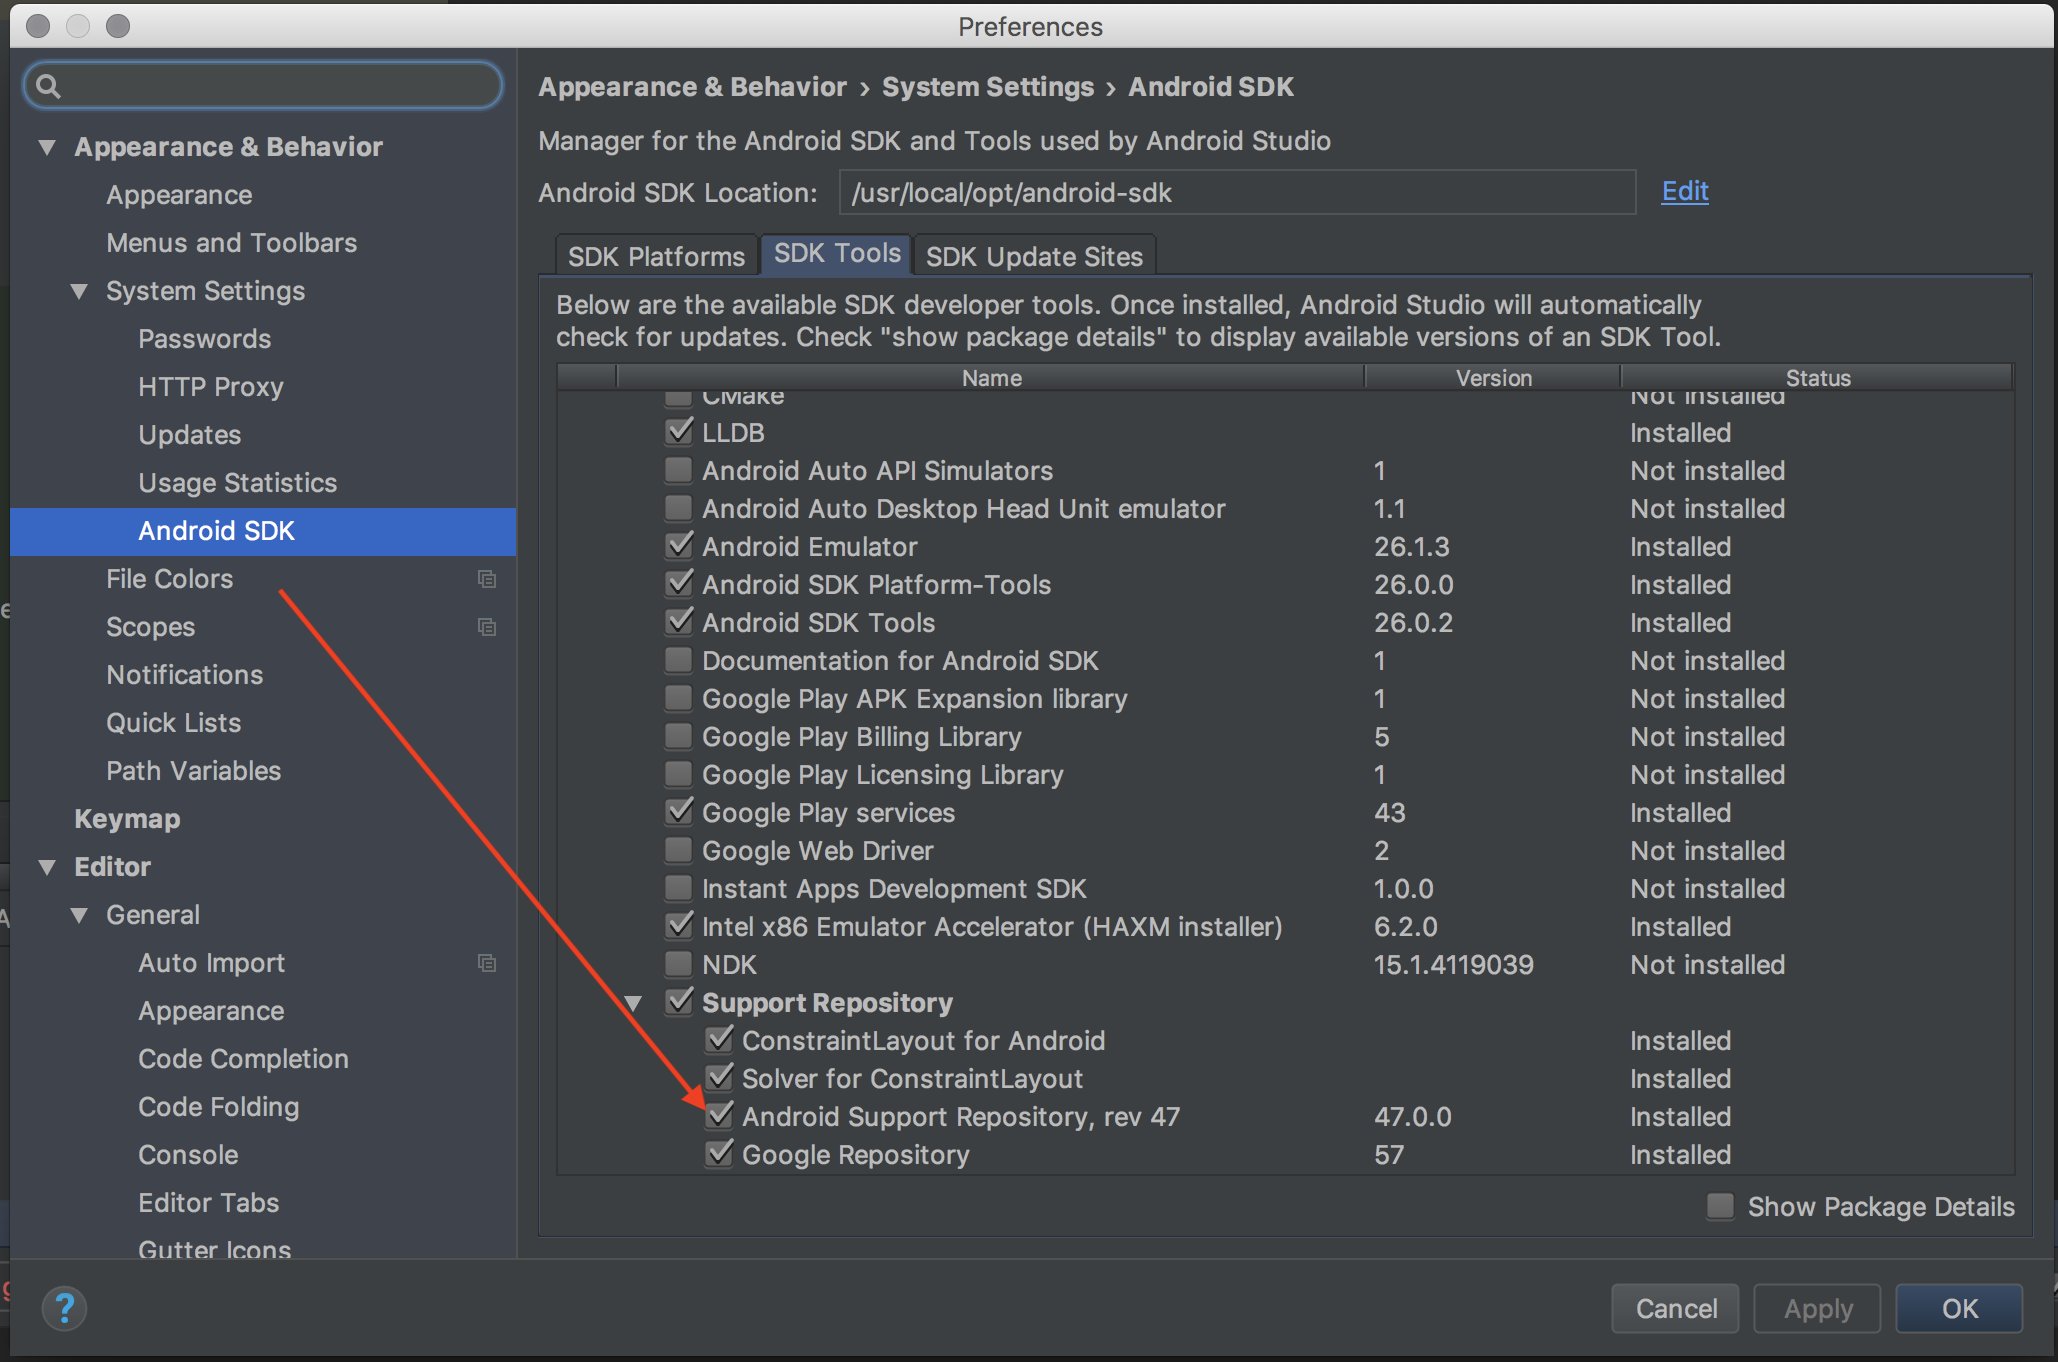
First of all, you’ll need to configure your Android Studio to be able to use support libraries, which include UiAutomator. This can be done in Android Studio settings under Android SDK panel.
Gradle
Next thing we’ll need is to set up Gradle. To do that, following changes should be added to build.gradle file.
android {
	...
    defaultConfig {
        ...
        testInstrumentationRunner "android.support.test.runner.AndroidJUnitRunner"
    }
...
dependencies {
	...
    androidTestCompile 'com.android.support.test.uiautomator:uiautomator-v18:2.1.3'
}
Since other settings in the file depend on your app and what it’s built for, they are up to you. But these two lines must be included into build.gradle in order to use UiAutomator in your project.
That’s basically it! It wasn’t difficult, right? You’re ready to start writing you first test.
Introduction to UiAutomator library
As I said before UiAutomator is a light-weight library so you won’t need to learn lots of classes to start using it. Here are the main ones:
- BySelector - class for specifying criteria for matching UI elements in app UI hierarchy. It’s similar to Selenium’s
Byclass.BySelector selector = new BySelector().text("foo"); - By - utility class for providing static factory methods for constructing
BySelectors using a shortened syntax. Following line brings the same meaning asnew BySelector().text("foo"):BySelector selector = By.text("foo"); - UiObject2 - one of the most important classes in UiAutomator library. It represents UI element in Android app hierarchy. It’s similar to Selenium’s
WebElementor Appium’sMobileElement. You can do lots of things with it (for example read and verify element’s attributes, click on it, wait for it, look for inner elements and many more).UiObject2 element = device(By.text("foo")); element.click(); - UiDevice - another important class for building successful UI test framework. It represents the device itself - either Android Phone, TV or even Watch. With its help you can find elements, wait for them, press device’s system buttons and even control remote in case of Android TV devices. Its Selenium equivalent would be
WebDriver, which I guess is familiar to most of you.UiDevice device = UiDevice.getInstance(InstrumentationRegistry.getInstrumentation()); device.pressBack(); - Until - utility class for constructing common conditions used for searching and waiting for elements (i.e. SearchCondition and UiObject2Condition, which were prototyped from Selenium’s
ExpectedConditions). Check out my recent post about conditions and waits in UiAutomator.long timeout = 10000L; device.wait(Until.gone(By.text("foo")), timeout) - Configurator - from the name of the class you could easily get that its main purpose is to configure your UiAutomator test runner. For example I use it to remove implicit timeouts of UiAutomator, because I like to decide whenever to wait for events or not by myself. But of course it’s up to you.
Configurator configurator = Configurator.getInstance();
long timeout = 0L;
configurator.setWaitForSelectorTimeout(timeout);
These are the most common classes in UiAutomator library. But there are others, which might be useful in building your automated test framework. You can check them out in the official documentation.
UiAutomator test example
Since you already know about main classes in the library let’s find out how to use them in your tests. Here is the code snippet of the simple test script.
@RunWith(AndroidJUnit4.class)
public class SimpleTest {

 private static final long DEFAULT_TIMEOUT = 30000L;
 private static final String PACKAGE_NAME = "com.example.app";
 private UiDevice device;

 @Before
 public void setUp() {
  // Disabling waiting for selector implicit timeout
  Configurator.getInstance().setWaitForSelectorTimeout(0);
  // Initializing UiDevice instance
  device = UiDevice.getInstance(InstrumentationRegistry
                   .getInstrumentation());

  // Starting the app
  Context context = InstrumentationRegistry.getInstrumentation()
                    .getContext();
  Intent intent = context.getPackageManager()
                    .getLaunchIntentForPackage(PACKAGE_NAME)
                    .addFlags(Intent.FLAG_ACTIVITY_CLEAR_TASK);
  context.startActivity(intent);

  // Waiting for app activity to appear
  device.wait(Until
        .hasObject(By.pkg(PACKAGE_NAME).depth(0)),
                   DEFAULT_TIMEOUT);
 }

 @Test
 public void formTest() {
  // Finding element
  UiObject2 editText = device.findObject(By.text("edit_text"));
  // Sending text to element
  editText.setText("123456");

  // Waiting for element
  BySelector submitButtonSelector = By.text("submit");
  UiObject2 submitButton = device.wait(Until
                .findObject(submitButtonSelector),
                DEFAULT_TIMEOUT);
  // Clicking on element
  submitButton.click();

  BySelector alertSelector = By.desc("alert");
  // Waiting for alert to appear
  UiObject2 alert = device.wait(Until.findObject(alert),
                                DEFAULT_TIMEOUT);
  assertEquals(alert.getText(), "Success!");
 }

 @After
 public void tearDown() {
  // Taking screenshot after test
  device.takeScreenshot(new File("screenshot-file-name.jpg"));
 }
}
Alright folks, now you have everything to start writing your own tests using UiAutomator. If you’re willing to design reliable and efficient test automation framework with this powerful tool, check out my posts about Page Object Pattern and Parallel Run with UiAutomator.

Comments